The performance screen: read the score, turn pages, annotate, play audio and automatic page turns, and run the metronome.
Score Viewer
Read the open score while playing and move to the bars you need. The viewer shows PDFs, images, scores made from MusicXML, and text pages such as ChordPro. First turn forward once and back, then check that you can read the notes or lyrics from your playing position. Reading the score does not require an audio track or automatic page turns.
Prepare Only What Your Performance Uses
For reading with swipes or a pedal, check the page range and readability. If you play with backing audio or want the score to advance automatically, prepare the audio or page-turn timeline in Item Settings.
Use Global Settings to change the shared look, or the Display Menu for this song's entry in the current setlist. Display Menu choices are saved too, so return to the previous choice if a trial does not suit the score.
Add a click, spoken count, Conductor connection, or between-song memo when your performance needs it.
Read, Turn Pages, and Reveal Controls
Working in the Score Area
Most of the screen is the score area. Turn pages by tapping, swiping, with an external keyboard, or with a page turner. When tap zones are on, tapping an edge moves to the previous or next page and briefly shades the side you touched. Tapping near the center toggles the controls. When tap zones are off, tapping toggles the controls. Even with the controls hidden, a long press can sometimes bring them back. Zoom with a two-finger pinch. Double-tapping does not zoom. While you are annotating or using a stylus, some taps and long presses are suppressed so you do not trigger them by accident.
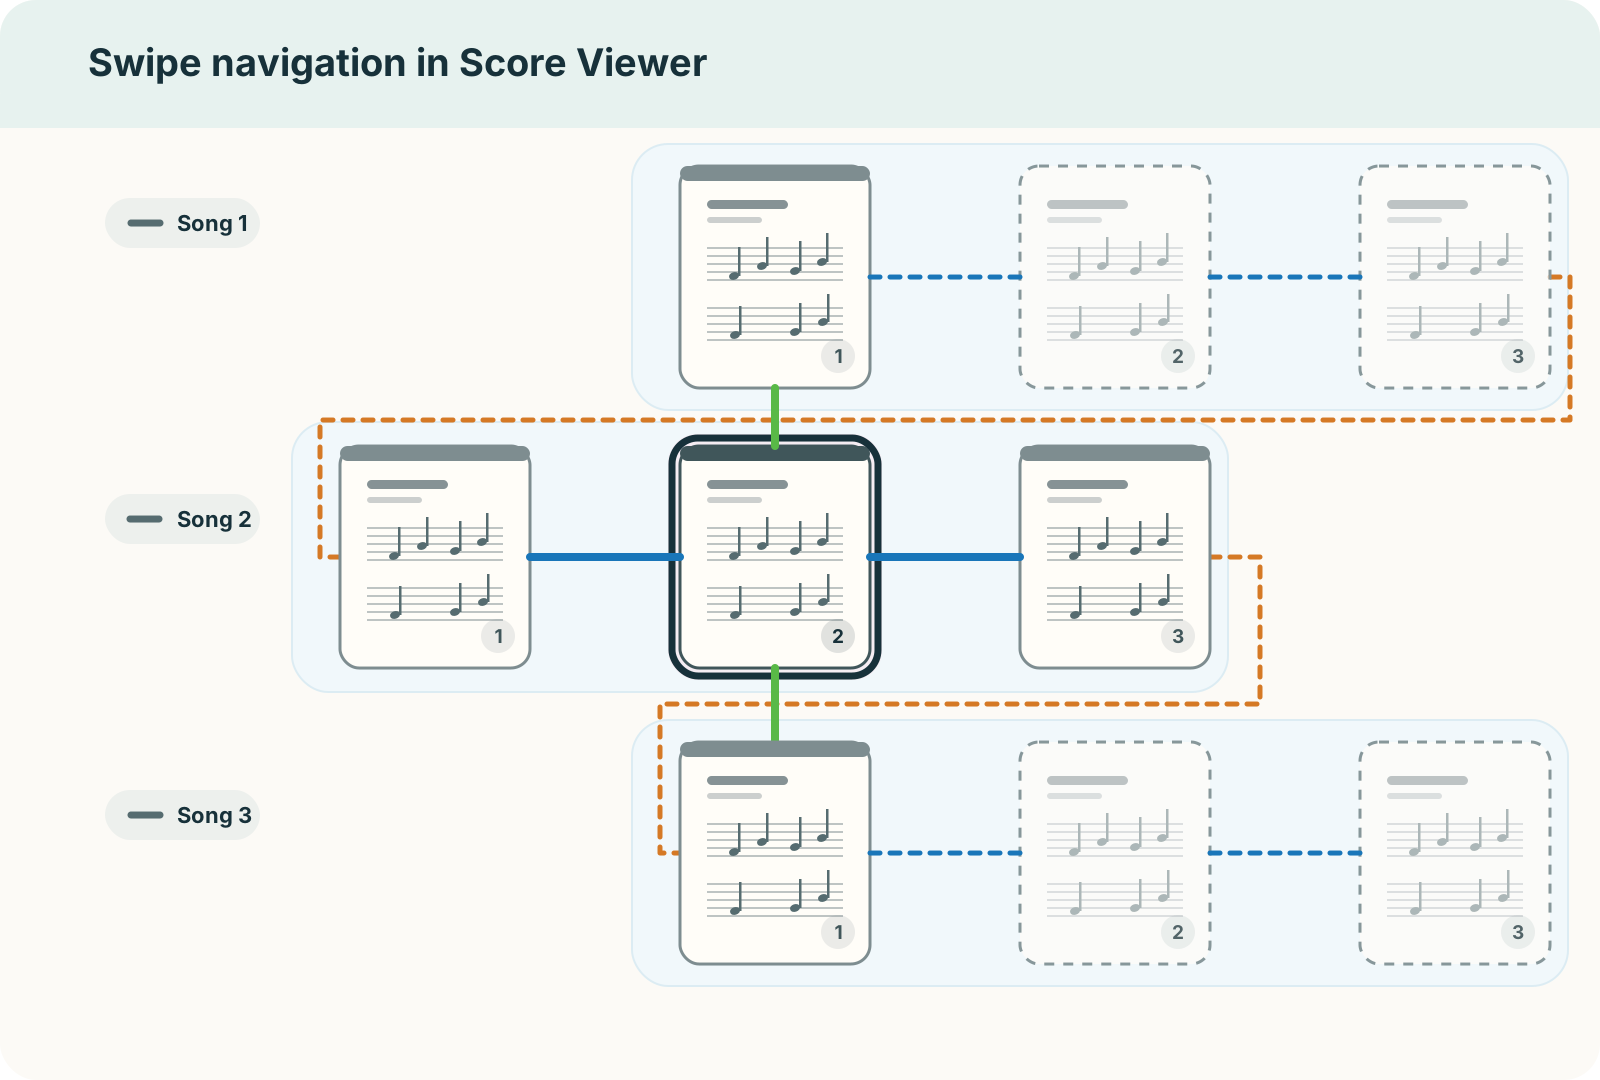
How Far a Swipe Takes You
With the default horizontal page turns, a swipe reaches the places shown below. If you change the scroll direction to vertical, the page-turn and song-navigation axes swap.
Using a Page Turner
Page turners, foot switches, and presentation clickers are supported when they send arrow keys or Page Up / Page Down. Pair them in the device's own Bluetooth settings; nothing is needed inside PagePilot. Pedals that send MIDI work differently — see "Using a MIDI External Controller" below. Both kinds connect over Bluetooth, so what tells them apart is where you connected them. Every one of those modes turns score pages.
Pair the device in your operating system's Bluetooth settings and confirm that it moves backward and forward correctly before a performance.
To move between songs in a setlist with an external keyboard, hold Shift while pressing an arrow key or Page Up / Page Down.
Using a MIDI External Controller
A USB or Bluetooth MIDI external controller can turn pages, and also move between songs in a setlist, play or stop, toggle the metronome and jump between cues. It works separately from page turners that connect as a keyboard. In MIDI devices under Advanced settings in Global Settings, connect the device and set the Score control row under MIDI input channels (default 2) to the controller's sending channel. More than one MIDI device can be used at once. If the device is connected but nothing happens, check the channel it sends in Receive check on the same screen.
The Control Change (CC) numbers the switches send map to actions as follows. On a pedal whose assignments can be edited, set only the numbers for the actions you use. A value of 64 or above counts as a press, and the next press only registers once the value has dropped below 64 again, so use momentary switching — a high value while pressed, back to a low one when released.
| CC number | Action |
|---|---|
| 20 | Previous song |
| 21 | Next song |
| 22 | Previous page |
| 23 | Next page |
| 24 | Play / stop |
| 25 | Metronome |
| 26 | Previous cue |
| 27 | Next cue |
You do not have to assign them all — set only the numbers for the actions you use.
Song moves work when the song was opened from a setlist; play / stop and cue jumps only on songs with a timeline. Neither is accepted while following a Conductor.
A switch can also open a song by its number. Send PC#1 on the score-control input channel to open the first song in the setlist, PC#2 for the second. PC#0, and numbers past the end of the setlist, do nothing. Reordering the setlist changes which song a number opens. Program Change on the sound input channel selects the shared instrument.
Choose a Song or Change the Score
Tap the title in the top bar to choose another song in this setlist. To recognize a page by the passage on it, open Page Overview from the bottom Timeline.
Use Annotation Palette to leave rehearsal directions on the score, or Text Page Editor to change the lyrics or chords themselves. Use the Display Menu when you need a larger page or a spread.
The top bar also opens MIDI Keyboard for a pitch check and the Conductor connection. Follow the relevant section when you need them.
Bottom Timeline
For songs that use audio or automatic page turns, the bottom timeline holds play/stop, playback position, add cue, the cue list, the mixer, Page Overview, and metronome controls.
The button at its right end shows the current page, such as 5 / 20; tap it to see every page in the setlist at once.
For songs that play with audio, turn pages automatically, or just run a timer, this is your control strip during the show.
Set the timeline display to Hidden when you want as much score as possible, and show it when you need the playback position or the next cue.
Where to Act While Playing
Tap near the middle of the score to hide the controls and leave more room for reading. Tap again to bring them back.
Use the top bar to choose a song, annotate, or adjust the display. Use the Timeline at the bottom to play or stop backing audio and move playback. Hidden controls do not mean playback has stopped.
Check display patterns, color inversion, output latency calibration, and detailed cue edits at rehearsal before relying on them in a performance.
External Keyboard Shortcuts
| Action | Key |
|---|---|
| Previous / next page | Arrow keys, Page Up / Page Down |
| Previous / next song | Shift + arrows, Shift + Page Up / Page Down |
| Play / stop | Space or B |
| Previous / next cue | Shift + B / N |
| Jump to songs 1–9 in the setlist | Number keys 1–9 |
| Metronome | C |
| Mixer | M |
| Toggle controls | Tab |
| Close controls / go back | Esc |
Play/stop and cue jumps work on songs with a timeline. A presentation clicker's spare button that sends B can also play or stop.
Audio and Automatic Page Turns
The app calls the automatic page-turn setup a "timeline": a record of which page or scroll position to move to at each point in the audio or timer. With audio it follows playback; without audio it still runs as a timer.
Record Your First Page Turn
First create or select a timeline for this song in Item Settings. If you use audio, select it too, then return to the Score Viewer.
- Display the page before the turn. For a first trial, 1 Page view makes a turn from page 1 to page 2 easy to check.
- Start playback from the Timeline. At the time you want the next page to appear, press the plus button, Add Cue.
- A cue is added at that time and the display advances to the next page you will read. In 2 in 1, it advances to the next spread. For a different destination, edit it in Cue Details.
- Stop, move the playback position to shortly before that cue on the Timeline, and play again. Check that the page appears before you need the next bars. If it is too early or late, adjust that cue's time.
Record later turns in the same way. If the Timeline is hidden, set Timeline display to Always in the Display Menu. If Add Cue is unavailable, check that the song has a timeline selected and that you are not following a Conductor.
Use Audio with a Score Opened from the Library
When you open a score straight from the library, "Play with audio" in the top bar lets you pick one of the songs that use this score; playback then uses that song's audio and timeline. With only one such song it opens straight away, with no picker in between. For a song in a setlist, the viewer normally uses the audio and timeline chosen in Item Settings.
Annotating
On PDF and image scores you can use the pen, highlighter, stamps, text labels, and the eraser. If you are only reading during the show, keeping the annotation palette closed cuts down on stray marks. To get markings out of the way for now, hide them from the Display menu instead of deleting them.
For the details — including shape recognition, which tidies up a roughly drawn circle or line — see Annotation Palette.
Note for 2-in-1 view: Annotations attach to the page where you start the stroke. If you begin on the left page and cross the spine, no line is drawn on the right page. To annotate the adjacent page, lift the pen and start a new stroke on that page.
Text Pages
ChordPro text pages can change their layout preset without leaving the Score Viewer. To edit the content, use Text Page Editor; to adjust the overall appearance, use Text Page Settings. For a quick pre-show ChordPro layout change, ChordPro Layout is the fastest route.
Metronome, MIDI Keyboard, and Mixer
On songs that need a click or a tempo reference, turn the metronome on from the bottom timeline. Adjust the sound and the downbeat accent in Metronome Settings. To check a pitch, open the MIDI keyboard from the top bar. Open the mixer when you want to check audio and metronome levels or where the sound is going.
If Bluetooth audio or an audio interface makes the sound lag behind the display, do not try to fix it while the score is open — calibrate it beforehand in Output Device Latency Calibration.
Conductor Integration
When a song from a setlist is open, Conductor sync is available. While connected, a line at the bottom edge of the screen also shows the sync state. While following Conductor, you may not be able to start or stop playback or move the playback position from the Viewer.
If following feels out of sync, resync from the top bar. For connection details, see Connection Status; for settings, see Conductor Settings.
Next Memo Cue
When a setlist memo comes immediately after the current song, a small label may appear near the bottom of the Score Viewer. It reminds you that an MC note, break, or other memo comes before the next song. If it gets in the way, tap it to hide it for that song.
For details, see Setlist Memos.
If Rehearsal Is Interrupted
- Controls are missing — Tap near the middle rather than an edge. An external keyboard's
Tabalso toggles them. If only the Timeline is missing, choose Always for Timeline display in the Display Menu. - Edge taps do not turn pages — If you are annotating, choose Finish Annotating to return to reading. Edge taps also stop turning pages while zoomed; pinch back to the normal size. With edge tap zones off, use a swipe. Use Page Overview to return directly to another page.
- Automatic page turns do not work — Check whether playback position advances. If it does but the score does not move, check the timeline selected in Item Settings. For manual reading, use swipes or a pedal.
- Page-turn time or tempo is wrong — Adjust the nearby cue in Cue Details. Check this separately from sound output delay.
- Only this song is hard to read — Check the display settings for its entry in this setlist. Changing Global Settings can change other songs too.
- No sound — Open Mixer Settings from the Timeline and check the desired sound's level, mute, and output.
- A MIDI device does not respond — Check the connection in MIDI Device Picker, then use Receive check to match its channel to the intended use.
If the problem continues, use the contact form with the song title, whether you opened it from a setlist or the library, and what you did when the problem appeared.