Set app-wide defaults, and use backup or diagnostics when you need them.
Global Settings
Use this screen for problems shared by several songs: small scores, accidental page turns, or wanting the same sound setup each time. If the current display and controls work for your performance, you do not need to reset every option.
Choose Global Settings from the ⋮ menu at the top of the screen. Note a value before changing it, adjust one option, then open a familiar song to check the result. If it is worse, restore the previous value in the same place.
Changing a display default also affects other songs that use it. To change only one song's appearance in this setlist, use the individual display options in Item Settings. Values specified there take priority. When changing audio or cues, also check the linked page for effects on other setlists using the same song.
Choose by the Problem
Use these starting points to find the option you need.
- Hard to read: Score Display Settings, Default Zoom, Appearance.
- Pages turn on their own while you play: Tap Zones, Setlist Navigation.
- No sound, or you want the click on its own output: Audio & Video Output, then Mixer Settings.
- Timelines, text pages, Conductor: open these once you know you use them.
- Restore, color inversion, output latency calibration: try them by rehearsal, not right before a show.
When unsure, work out whether the problem is with one song or with every song before you change an app-wide default.
Score Display Settings
Choose the page-turn display, continuous scroll, wide view, and other layouts separately for portrait and landscape. Choose whether to read one page large or see upcoming bars as well, then check a real score in portrait and landscape.
Page overview in the same section lets you choose None, Small, Medium, or Large for the within-song number badge on the tiles in Page Overview. This one is stored on this device only.
Some display patterns change how scroll direction and auto-follow (the screen moving on its own to keep up with the audio or timer) behave. Decide by whichever you have more of: songs you want to read a page at a time, or songs you want to read as one long scroll.
Tap Zones / Default Zoom
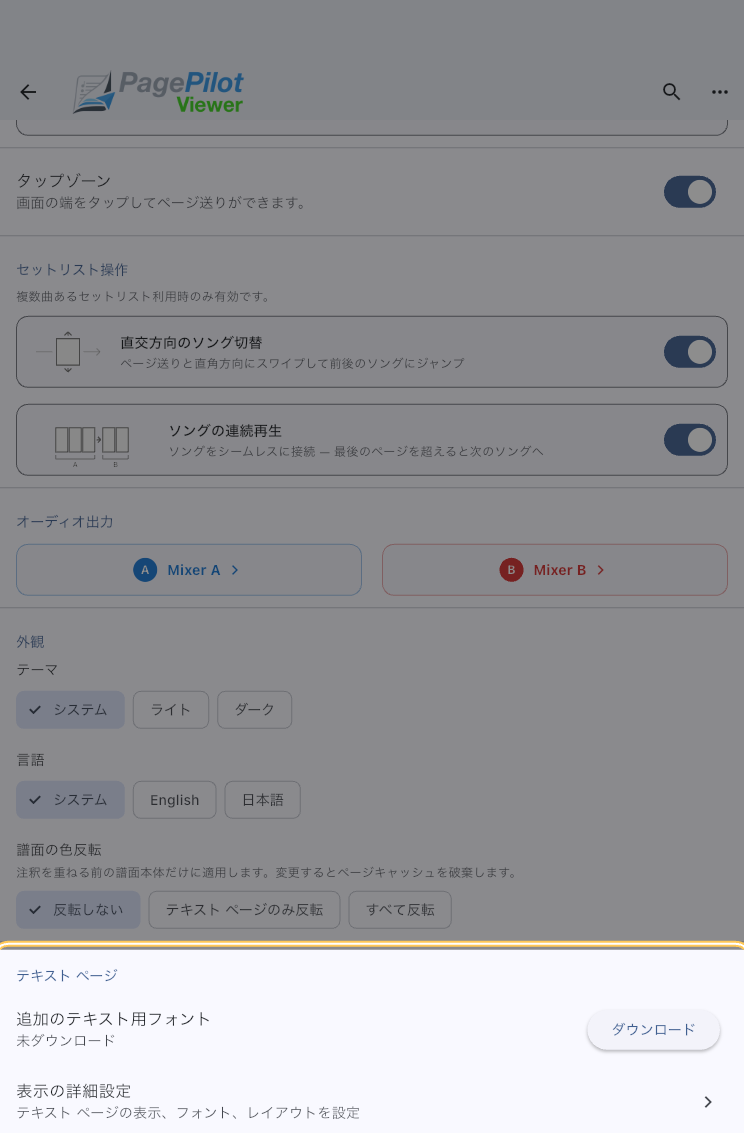
Choose whether taps at the screen edges turn pages or do nothing. You can also change how wide the tap-sensitive edge area is (1/6 Mode or 1/4 Mode). Come here when you want fewer accidental page turns during a performance, or when you want a deliberate tap workflow.
Default Zoom, in the same place, is how far a score is zoomed in when you open it. Raise it when small notes or lyrics are hard to read, and you will not have to zoom in by hand every time.
If you mostly use a page turner or an external keyboard, turning edge taps off cuts down on page turns caused by your hand or the music stand. If you turn pages with your finger, try forward and back with your performance grip. Narrow or disable the tap area if it responds accidentally.
Setlist Navigation
Turn the swipe that moves between songs in a setlist on or off, and decide whether one song runs straight into the next. Whether the next memo cue appears is decided here too. Use it to settle three questions before a show: swipe sideways to change songs or not, treat each song as its own unit or not, and show memos between songs or not.
Continuous Song Flow carries you into the next song when you go past the last page. It suits medleys and full run-throughs with audio. If you stop between songs, turn it off. It applies to paged displays opened from a setlist, such as 1 Page or 2 in 1. It does not apply to Continuous Scroll or text pages.
Next Memo Cue helps when you keep MC notes or instrument-change reminders in song order. Turning it off hides only the small cue at the bottom of the score; setlist memos, the running order, and search results all stay.
This Device
Device Name is how this device is identified in Conductor discovery and in the device and conflict displays of multi-device editing. A name like "Stage Left" or "Drums" says what it is for or where it sits, which cuts down on picking the wrong device when several are on stage. The name is saved on this device. Leave it blank to use a default such as the device name or model.
Audio & Video Output
Set the output destination for each of mixer A and mixer B — two mixers that let you send the metronome and your audio to separate outputs. The metronome's own settings live in the separate Metronome section. Settings for showing a video sound source on an external display are gathered here too (iPhone, iPad, and Android). If a show uses audio and the metronome as well as scores, check here first.
For details, see Mixer Settings. If the click and the on-screen ball or playback position feel out of step, see Output Device Latency. To put a music video on the house screen, see Video on an External Display; if the picture on that screen lags the sound, see Video Device Latency.
Open Mixer Settings when there is no sound, when sound comes out of the wrong speaker, or when you want to send only the click somewhere else. Output Device Latency does not fix silence. It lines up the click you hear with what the screen shows.
Metronome
Set how the metronome sounds and feels, as the baseline for the whole app. If you check the tempo often from the score viewer, getting it comfortable here first saves work later.
To check the tempo or the sound during a session, adjust it from Metronome Settings while a score is open. Set the defaults here when you want the same tone and the same accent every time.
Appearance
Language, theme, score color inversion, and other things about how the app looks. Getting these right for the stage lighting and the device orientation ahead of time makes the show itself easier.
Color inversion applies to the score itself, before annotations are drawn on top. Right after you change it, scores may take a moment to appear in the new colors. Check how it looks ahead of time, not right before a show.
Use Text Pages Only if you only want text pages darkened. Use All Scores if you want PDFs held down as well.
Open the Details You Need
Open dedicated screens from Advanced settings. Choose the option you need for your performance, such as using audio, reading lyrics, or following other devices.
Text Page
Check the font settings for text pages here. Use this when lyrics or chords are hard to read. Text size, margins, and ChordPro layout are saved as app-wide defaults; individual display settings take priority where specified.
"Advanced Display Settings"
Opening this item lets you fine-tune font size, margins, and the ChordPro layout preset used by text pages. Use it when you want lyrics-only pages and chord pages to look the way you need.
For details, see Text Page Settings.
Timeline
Open this when you want to see progress toward the next page turn or check playback position. The app calls the strip showing audio or timer time, cues, and playback position the timeline.
"Timeline Details"
Choose which controls appear, whether stopping returns to where this playback began, and whether cues snap to beats. Leave them unchanged if the current controls work for practice.
For details, see Timeline Settings. Open it when you want cues and the playback position to land on the beat with Snap to Beat.
"MIDI devices"
Opens the screen where you connect USB or Bluetooth MIDI external controllers and keyboards, and choose their input channels.
Use different input channels for a keyboard that plays sound and a pedal that controls scores. These choices apply to every connected device. Two devices fixed to the same channel cannot be separated into different uses.
- Check the device under Connection, or select it with Connect a device. On iPhone or iPad, first connect USB devices manually from the list as well.
- Under MIDI input channels, match the Sound row to the keyboard's sending channel and Score control to the pedal's. The defaults are sound on 1 and score control on 2. Your choices are saved; the two rows cannot use the same channel.
- Press a key or pedal. Check that Receive check shows the device and channel, and that you hear the intended sound or see the expected page turn. A connection icon alone does not confirm that controls work.
If nothing happens, compare the channel in Receive check with the two rows above. If they differ, change the app or device channel to match. If no message appears, check the connection and pairing. Connection actions are deferred during playback or while following Conductor.
Don't auto-connect under Remembered MIDI devices leaves the current connection in place but stops automatic connection next time. A successful manual connection makes the device eligible again. Test an action before a show rather than relying only on automatic connection.
For connection conditions, CC and Program Change numbers and actions, and receive indicators, see Using a MIDI External Controller in Score Viewer.
Conductor Sync
Open this when only your sound or display feels out of step while following Conductor. Leave it unchanged if they line up. The detail screen adjusts timing correction for the following side (child Viewer).
"Sync Details"
Opens the screen for how closely this device follows a Conductor. Worth a look only when you need it.
For details, see Conductor Sync Settings. Open it when the synced position or sound drifts a little.
Edit on Other Devices
Settings for carrying on with the same setlists and library across your own devices. Set this up when you want to build a setlist on an iPad and fix it later on an iPhone. If you only use one device, you can leave this alone.
"Edit on Other Devices"
Opens the screen where you turn syncing on and choose where the synced data is kept. iPhone and iPad keep it in iCloud; Android keeps it in a folder you choose yourself. There is no direct sync between iOS or iPadOS and Android.
Data Storage Location (Android)
On Android, scores, audio, annotations, and similar files can all be kept in PagePilot's own area, either in internal storage or on an SD card. Normal functions are unavailable without the SD card. Before changing storage, create a backup elsewhere and check the risks of data loss from formatting the card or removing the app.
For details, see Android Data Storage Location.
App Data Backup
This is what you use when replacing a device, or when you want to move everything to another one.
Scores, audio, songs, setlists, annotations, tags, and settings all go into a single .ppbk file.
It is not an everyday setting, but making one before you change devices or do a big cleanup is worth it.
"Back Up App Data"
Writes out all of your current app data as a backup file. The approximate size is shown before it starts, so you can check that the destination has room.
A backup contains PagePilot data. It does not include the device's photos or other apps. If you only want to hand someone one song or one setlist, use Send Song or Send Setlist.
"Restore from Backup"
Replaces this device's data with the contents of the .ppbk you choose.
The scores, audio, songs, setlists, annotations, and tags you have now, plus the settings shared between devices, are replaced by what is in the backup, and cannot be brought back.
The mixer A/B output destinations, per-device latency correction, the Android storage location, and the multi-device sync destination are not replaced; the values currently chosen on this device are kept.
If you want to keep data, first create a backup on this device too. Then use restore only when you have decided to make this device match the selected backup.
For details, see App Data Backup / Restore.
Restore does not mix the file you choose into your current data straight away. Once restore has been prepared, the replacement is applied the next time you open the app.
About This App
Shows the app version and the copyright notices. Quoting the version shown here when you contact us usually gets the problem solved faster.
"Share Diagnostics"
Shares a report of the app's recent state when you contact us. It is written with unnecessary device details left out, so use it when you want to explain what was on screen or narrow down an error. There is no need to touch it otherwise.
Diagnostics are there to help you describe a problem to support. They are not a way to send someone your scores, audio, or backups.
Troubleshooting
- If the app looks wrong across all your songs, start by reviewing Global Settings.
- If you want one song to behave differently, check the per-song display options in Item Settings.
- To move to a new device, make a backup on the old one and restore it on the new one. Restore replaces the data that is there, so back up any device whose current data you still want.